In part one, we reviewed some of the things you’ll need to consider when looking at various packs and boots available for hiking. With that covered, we can now discuss weight distribution and how to carry your ruck. Some people will say that there’s no right way to pack your ruck, but I disagree. It always seemed like a natural tendency for me to put the heaviest weight at the bottom of my pack, because for some reason this makes sense, right? Not really.
Imagine a line running vertically down your body, bisecting your center of gravity. Anything you put on one side must be counterbalanced on the other, just like a see-saw. Placing the heaviest weight in your pack lower, and even worse, further away from your body, means that you’ll have to balance in an increasingly awkward position. It will also give you a sensation of being pulled or dragged backwards. This translates to extra effort being exerted to balance the weight, an unnatural walking position, increased risk for injury, and an overall increased energy expenditure.
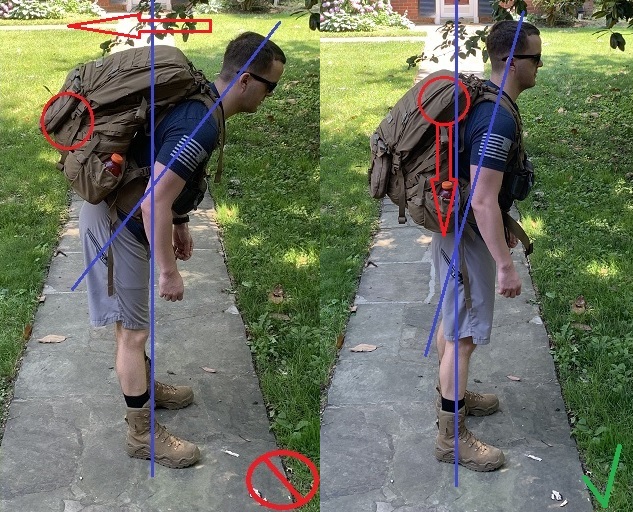
In my experience, a better way to carry heavy weight is to pack it high on your back, as close as possible to your shoulder blades. Doing so means that you’ll have to compensate less by leaning forward, making your balance more natural and less awkward. Furthermore, the sensation should be of the weight resting directly down on your hips (I mentioned previously that having thick hip pads was important). They’ll be doing all the work, and not your shoulders. Your shoulder straps merely serve to keep the pack as close to your torso as possible, transferring the weight from the pack to your hips. Don’t forget to cinch your hip belt as tightly as possible. If you find yourself rucking with the posture in the first example above, try making these adjustments. The difference will feel like night and day.
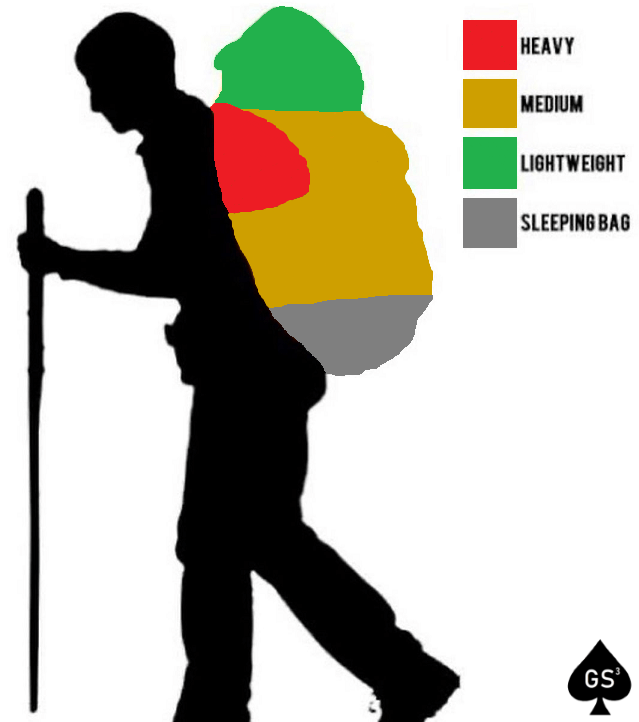
Check out the transparent chart above. My goal is to put the heaviest weight right in between my shoulder blades. As a civilian, this could mean your food, tent, cooking equipment, or heavier electronics. On the military side of the house, I’d really try to put my ammo and radio equipment here. Your medium weight gear such as Gore-Tex, ponchos, and other clothing can go around and below your heavy stuff as a buffer. On the bottom I like to put items that are medium weight but can afford to take a beating, such as when you take 5 and sit down without taking your pack off. A sleeping system or an extra pair of boots would be ideal here. And finally, your lightest weight gear goes at the top of the bag. This could be your headlamp, pogey bait, water source, and anything else you’d want quick access to.
Next, let’s talk about nutrition. When I was in the Marine Corps, our basic instruction was to drink water 24 to 48 hours prior to the hiking evolution, and that’s good advice. I would take that to the extreme and consume a full gallon of water each day for two days prior to our events. I’m not saying you need to be as excessive as I was back then, but hydration is a cornerstone to a successful hiking experience. Speaking of which…
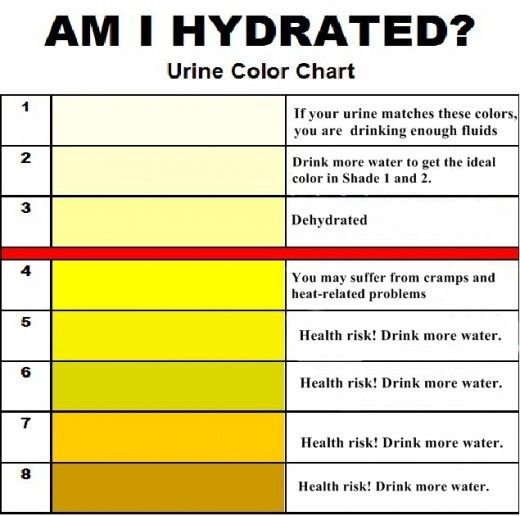
Are you wondering about your level of hydration? Consult this handy chart.
I tend not to drink large amounts of water during the actual hike. You’re not going to improve your hydration by drinking during the event. Instead, I try to focus my liquid consumption on electrolyte replacement, Gatorade or a similar product is fine. If you want to go to the next level, drink Pedialyte. I’m not kidding. Originally designed for rehydrating sick children, its honestly the closest I’ve experienced to an oral IV. The results are real. I recommend drinking a quarter bottle of Gatorade or Pedialyte every thirty to forty-five minutes.
Liquid electrolyte replacement pairs well with nutrient/ calorie maintenance. When I was first learning about hiking nutrition, I started out with bite size Snickers bars, eating two every thirty minutes. My rationale was that I had heard of extreme endurance athletes doing something similar, and it does work (though they’re not even the best candy option). However, consuming chocolate during an athletic event, particularly in the summer heat, makes for a difficult proposition. A better solution comes in the form of specially designed gels and chews for endurance athletes. I’ve been using GU Energy products, and they not only work great, but are easier to carry and consume over the long duration of a hike. The combination of BCAAs, electrolytes, caffeine, and carbohydrates make for a potent supplement that keeps you mentally and physically in the game. I consume one serving every thirty minutes.
Absent these nutrient replacement strategies, you’ll start to notice what feels like a fuzzy head. Mental capacity will be severely dulled, and some report a sensation of darkness encroaching on the periphery of their vision. Cramps may also increasingly occur and exhaustion will feel more severe as your body’s gas tank hits empty. You may even experience mood swings or phantom tastes/smells. These are all signs that your body is trying to tell you you’re out of gas.
I had never been educated about the importance of nutrient replacement on a hike. I thought all the negative effects were part and parcel to the event, and any admission was just a sign of weakness. This is wrong. Do yourself a favor and supply your body with the fuel it needs to be successful. Not doing so isn’t tough, it’s plain stupid.


Full Disclosure: I have no affiliation with any of the products mentioned in this article. All items were purchased with personal funds and this review was written without regard for any outside influence.

One thought on “Intro to Hiking (Part 2): Packing and Nutrition”